iWeb Tip #27 – CSS Buttons in iWeb

 This tip is a very easy and helpful tip for any iWeb site. It allows you to easily add great looking buttons to your iWebsite. Usually to create buttons in iWeb you have to use the iWeb shapes with some creative colors, but this tip simply has you paste some code in an HTML Snippet hit apply and you’ll have a beautiful CSS button. CSS stands for Cascading Style Sheets and is the core to the style, colors, fonts, etc to any website. So we are using this type of code to create buttons only using code, meaning no images or anything. They end up looking fantastic on your site, load very quickly, and are very easy to put into your site. So let’s get started on how to get them into your site.
CSS Buttons
Really all there is to this tip is find the button your want below, copy the code, and paste it into an HTML Snippet. That’s really all there is to it. View the buttons below to view all the buttons and their interactive rollovers, then find matching button code to paste into your site.
[iWeb-Code=’css_buttons’]
CSS Button HTML Snippet Code
Simply click the button that you’d like to add, copy the code, and paste it into an HTML Snippet. Don’t forget to change the link URL and button text at the bottom of the code.
[EXPAND Button-1]
[snipt code=”9d6b7f8a89498b304460bda117e7cbb5″]
[/EXPAND]
[EXPAND Button-2]
[snipt code=”ab76d80cf5bbeca1989505462e17c048″]
[/EXPAND]
[EXPAND Button-3]
[snipt code=”5e36ea861a9f5cee86ee1ea33ec8713a”]
[/EXPAND]
[EXPAND Button-4]
[snipt code=”ad3c1b2c792edf576453f65ce056b611″]
[/EXPAND]
[EXPAND Button-5]
[snipt code=”816a638badb719fd8b8f1a970648cd2a”]
[/EXPAND]
[EXPAND Button-6]
[snipt code=”1374a529042b0c787f3ef9881addaf23″]
[/EXPAND]
[EXPAND Button-7]
[snipt code=”2d2ac838dea87930e10e70c8bb5a1cd1″]
[/EXPAND]
[EXPAND Button-8]
[snipt code=”df8d8eea3625ef4675f6f0592d05a21f”]
[/EXPAND]
[EXPAND Button-9]
[snipt code=”f766016428aa808624f0905ff926006d”]
[/EXPAND]
[EXPAND Button-10]
[snipt code=”374169c1f94c0b98da307eddcceee997″]
[/EXPAND]
[EXPAND Button-11]
[snipt code=”8a5b2fe59e8d6c877ea468a74991db54″]
[/EXPAND]
[EXPAND Button-12]
[snipt code=”8c9285bea48ddad67d47db192abe415f”]
[/EXPAND]
Customization
The only customization you’ll need to do is regarding perhaps colors, fonts, and sizes. So to do that just find the line in the code that has what element you want to edit and change it to what you want. For example you might see the line of code font: 14px/100% Arial, Helvetica, sans-serif; which is telling it that you want to use the font Arial, and if the user doesn’t have that font it will use Helvetica, and if they don’t have that font it will use any san-serif font like verdana, or something else. So you can just change that to be the (web-safe) font you want. You’ll also see font sizes like 14px, etc. Just change those to what size you want. So spotting font options in the code is pretty easy.
Changing colors in the buttons requires for you to change the colors according to hex values. So for example black is #000000 and white is #ffffff and so forth. There is a special color picker that you can install right into your iWeb that will add an extra tab in the default color picker with hex values. It makes it super easy to change colors and is a must for any iWeb designer. You can get it by going here. If you don’t want to install that (which you should) you can view an online color picker by going here. You’ll see the code to change colors under the section that’s labeled: /* iWebUnlimited Button Color */ then you’ll see a line of code that starts with “background” then it states the gradient color to and from. Just replace the # color code to what you want it to be.
As for sizes (width), you’ll notice at the very top of the code (the 2nd line) there is a line that has the width in it. Just change that width till your button fits. The current width of the buttons is so it fits the current text in it. So if you put some text in your button that is longer or shorter you’ll probably have to change this width so the snippet fits your button better.
So how do I change the button link and button text you say? Simple you’ll see a line of code that says “Button Link” towards the bottom of the code snippet. Just replace your link URL, then the text of the button you’ll see is wrapped in same code that’s called “span” tags. It’s labeled probably “button-#”, just change that to what you want, for example you might change it to “Learn More”, or “Contact Us”, etc.
I’ve added some code here so you can easily adjust the size and some styling of your button. Here’s some examples:
[iWeb-Code=’css_buttons2′]
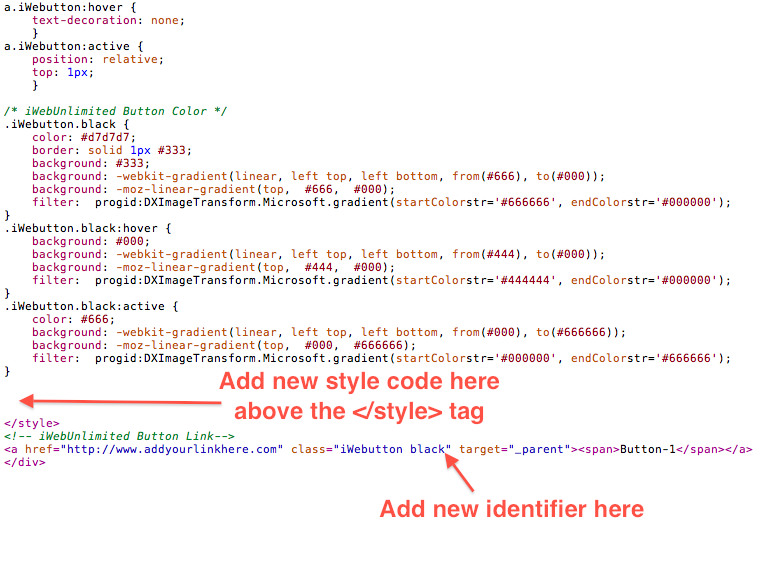
To add these styles to your button just add the code below inside of the style tags right before the close </style> tag. Then you’ll need to add the link identifier to your link. Where is that, you ask? You’ll see in your link which starts with <a you’ll see a section that says class= then a bunch of css identifyers, for example you’ll see “iWebutton blue” for example. So to get the large button for example, just add the large code to the style section and put in the identifyer “large” so the full class part would look like this class=”iWebutton blue large”.
Here are the codes you’ll need to add to your code to get these styles:
[EXPAND XXLarge (identifier: “xxlarge)”]
[snipt code=”d0f20013da49b5680f8f6638017be51c”]
[/EXPAND]
[EXPAND XXLarge Rounded (identifier: “xxlarge rounded”)]
[snipt code=”0ca8ccc1dfa3db06be00547550b2bdba”]
[/EXPAND]
[EXPAND XXLarge Iconized (identifier: “xxlarge iconized”]
[snipt code=”e6a4cfac7aa236793087883f7d417c4c”]
[/EXPAND]
[EXPAND XLarge (Identifier: “xlarge”)]
[snipt code=”507ebf1f4f4b7956b870ba671862b2bd”]
[/EXPAND]
[EXPAND XLarge Rounded (Identifier: “xlarge rounded”)]
[snipt code=”11a5b219d2bdebdbe849ec92eada49cb”]
[/EXPAND]
[EXPAND XLarge Iconized (Identifier: “xlarge iconized”)]
[snipt code=”ae1990c3b6c518a57fbb1c1c6ff301dc”]
[/EXPAND]
[EXPAND Large (Identifier: “large”)]

[/EXPAND]
[EXPAND Large Rounded (Identifier: “large rounded”)]

[/EXPAND]
[EXPAND Large Iconized (Identifier: “large iconized”)]

[/EXPAND]
[EXPAND Small (Identifier: “small”)]

[/EXPAND]
[EXPAND Small Rounded (Identifier: “small rounded”)]

[/EXPAND]
[EXPAND Small Iconized (Identifier: “small iconized”)]

[/EXPAND]
[EXPAND XSmall (Identifier: “xsmall”)]

[/EXPAND]
[EXPAND XSmall Rounded (Identifier: “xsmall rounded”)]

[/EXPAND]
[EXPAND XSmall Iconized (Identifier: “xsmall iconized”)]
[snipt code=”6b4a78cbea2ee1005135e5a5146471e1″]
[/EXPAND]
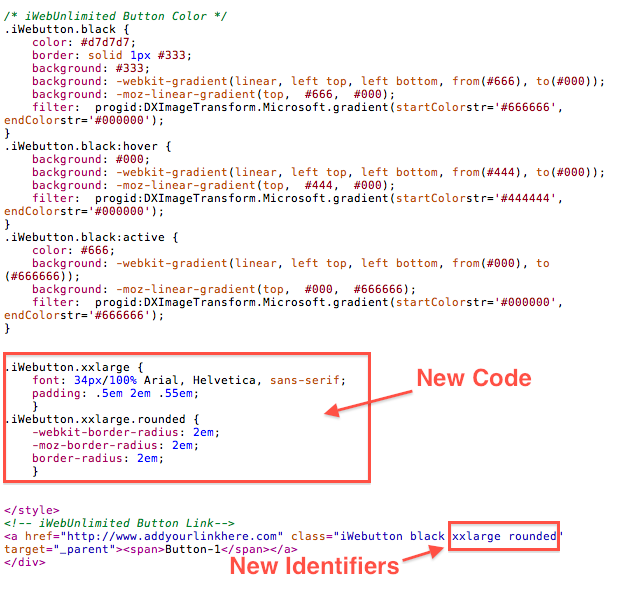
So basically, you get the code from the first snippets, then if you want to customize that button with one of these styles above then add the code above the closing style tag and add the identifier to the link class. Here’s some screenshots to help you out.

So the final code would look like this:
If you are using the “Iconized” style in your button you have to add some extra code to the actual link itself. Here’s what your link should look like:
[snipt code=”b6f94520e3fbb6a398484dcf47aab385″]
Notice the link to an image. So basically you’ll need to upload an icon (that’s 16 x 16 at most in pixels) to your server, then link to it in the code. You’ll notice that the difference is that in the span tags we’ve added this one line of code that has the link to the image in it: style=background:url(https://iwebunlimited.com/examples/css_buttons/bird.png) no-repeat 0 45%;
That should do it. Hope you have fun with this tip and can add some of these great buttons to your site and if you can spare donation to the website and to support the iWeb cause here click the donate button below. Thanks so much and that for stopping by iWebUnlimited.com.
[iWeb-Code=’donation’]
I’ll be adding a video on this tip soon, so if you are a bit lost you’ll be able to follow the video to get these cool buttons on your site. Thanks again.


Has something gone wrong with the site? I don’t see any buttons above.